
Table Of Contents
- Installing the Virtual Machine
- How to use Poky
- How to customize u-boot
- How to customize the Linux Kernel
- How to create the SD card
- How to write the NAND memory
- How to use HOB
- How to configure the remote boot
- How to write a software application for the Pengwyn board
- Qt SDK
- Hardware
- Opkg Basics
- How to add 3”5 display with touch screen
How to configure the remote boot
Remote boot can work like in the following figure:
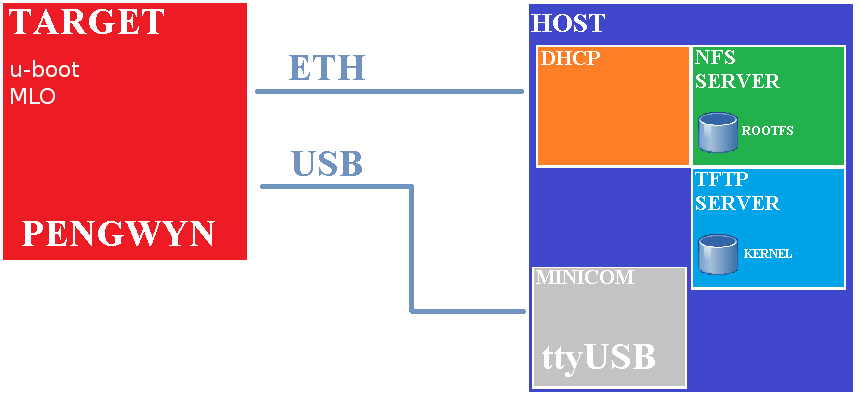
To boot from remote the host machine must share the kernel image through a tftp server and the root filesystem through an NFS server. Since the target will look for a dhcp during the boot, the host machine needs to have a dhcp server up and running as well.
This guide will present an example of configuration for booting the pengwyn board with a remote kernel and a remote filesystem. To make things work you need to be sure the target can reach the host machine and all the required services (dhcp, tftp, NFS) are properly configured and up and running.
How to set the network
The operating system that runs the needed network services (like dhcp, tftp and NFS) will be named host machine, the board that downloads from the host machine the kernel image and the root file system will be named target machine. When the target machine power on, the first program that runs is the bootloader u-boot. First, u-boot reads uEnv.txt which contains information about the server IP address, the name of the kernel image and where is located the root file system, after that downloads through tftp the kernel image and runs it with the arguments loaded before. When Linux boots it sends DHCP requests to acquire his IP address before to load the network filesystem (NFS) and runs the boot manager (systemd or init) found in root file system.
Host Machine
The target must know the host ip address, so it is suggestible to assign a fixed IP address to the host machine (in this example we will use 192.168.0.20).
DHCP
You need configure your DHCP server to return a fixed IP address for the target board. Set the correct IP addresses in /etc/dhcp3/dhcpd.conf:
subnet X.Y.Z.0 netmask 255.255.255.0 {
 interface eth0;
 range X.Y.Z.T X.Y.Z.T;
 option subnet-mask 255.255.255.0;
 option broadcast-address X.Y.Z.255;
 option routers X.Y.0.1;
}
Finally, the dhcp demon must be restarted:
/etc/init.d/dhcp3-server restart
SD-CARD & uEnv.txt
You need to have a bootable SD-CARD with u-boot and MLO installed in the FAT partition. Refer to How to create the SD card page on how to create the SD card.
Copy uEnv.txt file located in /home/pengwyn/yocto/remote/uEnv.txt to the boot partition. The file has the following structure:
ipaddr=X.Y.Z.T
serverip=X.Y.Z.H
gatewayip=X.Y.Z.G
netmask=255.255.255.0
hostname=pengwyn
rootpath=/home/pengwyn/yocto/remote/nfs-eclipse-rootfs
bootfile=uImage
net_args=run bootargs_defaults;setenv bootargs ${bootargs} root=/dev/nfs nfsroot=${serverip}:${rootpath},${nfsopts} rw ip=${ipaddr}:${serverip}::${netmask}:${hostname}:${nfsdevice};
tftp_nfs_boot=echo Booting from network...; tftp ${loadaddr} ${serverip}:${bootfile}; run net_args; bootm ${loadaddr};
uenvcmd=run tftp_nfs_boot;
Boot up
You must connect target and host machines together by means of a network interface, one possible network schema is to connect both of them with the same ethernet cable through a point to point connection, the other possible schema is to connect them to the same LAN. With the last connection schema, double check that the IP addresses specified within file1, file2, file3 are compliant with your network address space. To get all the console messages at boot and, at the end of the boot process, a command prompt, connect the Pengwyn board via USB to your computer.
Usb-Serial
On your Host Operating System (not on guest operating system running with the Virtual Machine) you need to have a serial communication program like minicom (for Linux as host operating systems) or HyperTerminal (for Windows as host operating system). In this document only the setup of minicom program will be treated.
The required steps to get the usb-serial link work are:
- clean the kernel messages buffer with the following command:
sudo dmesg -c
- connect the Pengwyn board to the PC with mini-USB cable near DVI connector.
- determine the serial device name with this command:
dmesg | grep ttyUSB
on the standard output you will see something like:
[11401.006607] usb 1-1.1: FTDI USB Serial Device converter now attached to ttyUSB0
In such an example, ttyUSB0 is the serial device name, and /dev/ttyUSB0 is the serial device
3. run command (sudo password is pengwyn)
sudo minicom -w -s
- select select port setup and press enter.
- setup the port with the following configuration:
A -    Serial Device      : /dev/ttyUSB0
B - Lockfile Location     : /var/lock
C -   Callin Program      :
D -  Callout Program      :
E -    Bps/Par/Bits       : 115200 8N1
F - Hardware Flow Control : No
G - Software Flow Control : No
- once you are done configuring the serial port, you are back to minicom main menu and you can select exit.
- Control that the SD card is in the slot of Pengwyn board if is in it, you can press the reset button.
- if everything has been properly configured, the target board will download the kernel image
Booting from network...
link up on port 0, speed 100, full duplex
link up on port 1, speed 100, full duplex
Using cpsw device
TFTP from server 192.168.0.20; our IP address is 192.168.0.101
Filename 'uImage'.
Load address: 0x80200000
Loading: #################################################################
- and the Linux kernel will mount the root filesystem by means of NFS:
[    5.791564] Sending DHCP and RARP requests . OK
[    5.802032] IP-Config: Got DHCP answer from 192.168.0.20, my address is 192.168.0.101
[    5.813079] IP-Config: Complete:
[    5.816436]      device=eth0, addr=192.168.0.101, mask=255.255.255.0, gw=255.255.255.255,
[    5.824951]      host=pengwyn, domain=, nis-domain=(none),
[    5.830657]      bootserver=126.126.126.136, rootserver=192.168.0.20, rootpath=
[    5.848632] VFS: Mounted root (nfs filesystem) on device 0:16.
- finally, the login will appear:
Yocto (Built by Poky 7.0.1) 1.2.1
 ttyO0

pengwyn login:
Login with username root, no password is required.